MQTT Setup and Topics

MQTT is only available for the Primary Controller
If you wish to use MQTT with the system, you must meet a few prerequisites and also enable and configure MQTT in the web application.
Prerequisites
To use MQTT you must have a local MQTT broker available on your network. While you can technically use a cloud-based MQTT provider, this is not recommended due to the lag introduced between sending a command and having it received by the system. One of the most popular free local versions is Eclipse Mosquitto.
If you are a Home Assistant user, you can turn Home Assistant into your MQTT broker by installing the MQTT broker app/add-on.
Understanding Topics
MQTT works using a subscribe/publish method. The system allows you to define these topics, and your external system must use these same topics for proper communication.
- Publish (stat/): All messages sent by the controller are published to a topic prepended with
stat/. - Subscribe (cmnd/): All topics subscribed to by the controller are prepended with
cmnd/.
Enabling and Configuring MQTT
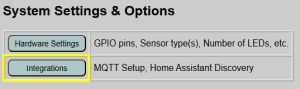
MQTT configuration is found under the primary controller’s Integrations, accessible from the main page of the web application.
The MQTT setup section is located at the top of the integration page.
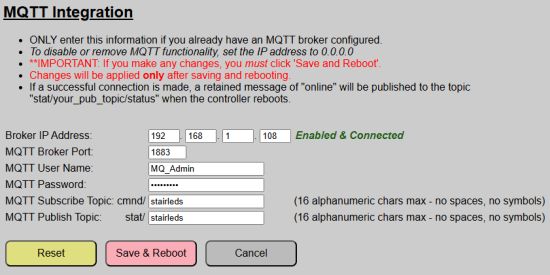
- Broker IP Address: Enter the IP address of your MQTT broker. Use
0.0.0.0to disable/ignore MQTT. - MQTT Broker Port: Default is
1883. - MQTT User Name / Password: Enter the account credentials for your broker.
- Subscribe Topic: Specify up to 16 alphanumeric characters. The system prepends
cmnd/. Example:cmnd/stairleds/*. - Publish Topic: Specify up to 16 alphanumeric characters. The system prepends
stat/. Example:stat/stairleds/.
⚠️ Topics
For most brokers, topics are case-sensitive. As a best practice, only use lowercase letters and numbers in your topics. Spaces and symbols are not permitted.
💡 Integration Tip
Since the system prependsstat/andcmnd/automatically, you can use the same string for both (e.g.,stairleds) to simplify your naming convention.
Maintenance & Buttons
⚠️ Important:
MQTT settings are saved to the main configuration file. Therefore any changes require a ‘Save & Reboot’ to write the changes to the configuration and then reload them. And changes made to MQTT settings will only be applied after a system reboot occurs.
- Reset Button: Restores any changed values back to the current saved configuration.
- Save and Reboot: Saves all current values on the page. The Primary controller will reboot. The system will start publishing/subscribing to MQTT topics upon completion of the boot.
- Cancel Button: Discards changes and returns to the main menu.
MQTT State (Publish) Topics
The system publishes current values and diagnostic data to the broker. All state topics are published with the Retain flag set to TRUE.
Diagnostic / Boot Topics
These values are published only at boot time, except for LWT (status) which is updated by the broker.
Formatted as stat/[your-publish-topic]/[topic-suffix].
| Topic Suffix | Payload Type | Example/Range | Notes |
|---|---|---|---|
/status | String | online or offline | Controller Last will and testament. (LWT) |
/ipaddr | String | 192.168.1.51 | Controller’s IP address |
/macaddress | String | 08:B6:1F:3C:1F:B0 | WIFI MAC address of display ESP32 |
/version | String | v0.23 | Primary controller’s firmware version |
Entity State Topics
These topics are updated by the primary controller whenever a given value or state changes. Not all values may be published depending upon your controller’s hardware configuration.
Some states are only updated when the system is in manual mode (sensor_override ON - see commands that follow). These are denoted in the notes column and are indepenent of the effects, colors and speeds assigned to the sensor(s).
Formatted as stat/[your-publish-topic]/[topic-suffix]
| Topic Suffix | Payload Type | Example/Range | Notes |
|---|---|---|---|
/ledstate | ON / OFF | OFF | The current state of the LED strip(s). |
/ledeffect | String | Chase | LED Effect used when manually controlled. Must match existing predefined effect name. |
/ledspeed | number | 1 - 10 | Speed for the ledeffect when manually controlled. Not used for some effects (e.g. Solid). |
/ledcolor | RGB Color String | 0,255,0 | Current Primary RGB color of the LED strip when manually controlled: rr,gg,bb where each value can range from 0-255. |
/ledcolor2 | RGB Color String | 0,255,0 | Current Secondary RGB color of the LED strip when manually controlled. Uses same payload as /ledcolor. Ignored for effects that only use the primary color. |
/ledbrightness | number | 0 - 255 | Current brightness setting of the LED strip. May indicate 0 when LED strip is off. |
/ledontime | number | 1 - 600 | Time, in seconds, that the LEDs will remain on after all sensors report clear. |
/sensor1state | ON / OFF | OFF | State of sensor 1. ON when triggered, OFF when clear. Published regardless of sensor type (wired or wireless). |
/sensor1_toggle | ON / OFF | ON | Current state of Sensor 1’s Toggle Off setting. |
/effect1 | String | Chase | LED Effect name for Sensor 1. |
/effect1_speed | number | 1 - 10 | Speed for LED Effect1. Not used for some effects (e.g.Solid) |
/effect1_color1 | String | 255,0,0 | Primary color for LED Effect1: rr,gg,bb where each value can range from 0-255. |
/effect1_color2 | String | 0,255,0 | Secondary color for LED Effect1: rr,gg,bb where each value can range from 0-255. Not used by all effects. |
/sensor2state | ON / OFF | OFF | State of sensor 2. ON when triggered, OFF when clear. Published regardless of sensor type (wired or wireless). |
/sensor2_toggle | ON / OFF | ON | Current state of Sensor 2’s Toggle Off setting. |
/effect2 | String | Chase | LED Effect name for Sensor 2. |
/effect2_speed | number | 1 - 10 | Speed for LED Effect2. Not used for some effects (e.g.Solid). |
/effect2_color1 | String | 255,0,0 | Primary color for LED Effect2: rr,gg,bb where each value can range from 0-255. |
/effect2_color2 | String | 0,255,0 | Secondary color for LED Effect2: rr,gg,bb where each value can range from 0-255. Not used by all effects. |
/sensor_override | ON / OFF | OFF | Current state of the sensor override setting (see CMND below). |
/light | JSON | – | Only present if Home Assistant Discovery is enabled. See the Discovery topic. |
MQTT Command (Subscribe) Topics
The LED Controller is a very attentive listener. It watches these specific topics for commands; just ensure your syntax is perfect, or the controller will politely ignore you. Unless otherwise noted, all commands sent to the controller should be published with a retain flag of FALSE.
⚠️ Special Notes on Using MQTT Commands
- Many of the state topics above contain an underscore ( _ ) in the topic-suffix key. To help differentiate state from command topics, the underscore is not used for commands. If you attempt to publish a command using the state topic-suffix key with an underscore, it will be seen as an invalid command and will be ignored.
- All topics and topic-suffixes are CASE SENSITIVE./ledstateis a valid command, while/ledStatewill be ignored. All MQTT command suffixes privded here use lower case.
- Unless otherwise noted, all settings changes are only applied to the ACTIVE system settings and will be lost upon a controller restart.
- Commands sent to non-defined hardware are discarded (e.g. sending a ToF command when PIR sensors are defined in the hardware settings or sending a command for Sensor2 when only one sensor has been configured.)
- Command Format:
cmnd/[your-subscribe-topic]/[topic-suffix]. - Payload Format: Varies based on command but should always be sent as a “raw” plain-text value, not as JSON or XML. See table below.
Overriding the Sensors
If you are attempting to manually control the LEDs or certain other features, you should first enable the sensor override feature via the /sensoroverride command. Otherwise, the normal sensor processing may immediately be overwritten by the sensor states. For example, if you attempt to manually turn the LEDs on via MQTT when the sensors are still active, the LEDs will immediately turn off again. Just be sure to disable the sensor override when you want to return the system to normal operation.
| Topic Suffix | Payload(s) | Example | Notes |
|---|---|---|---|
/sensoroverride | ON / OFF | OFF | Enables (ON) or Disables (OFF) the sensor override setting |
⚠️ These commands require that the sensoroverride setting to be “ON” for proper functionality. Note that color, effect and speed settings here are independent and separate for any of the parameters set for the a sensor’s effect, color and speed. These MQTT commands are meant for use when the system’s sensors are overridden.
| Topic Suffix | Payload(s) | Example | Notes |
|---|---|---|---|
/ledstate | ON / OFF | ON | Immediately toggles LEDs off or on. LEDs will turn on with the last issued /ledcolor, /effect and /speed values. |
/ledeffect | String | CrissCross | Sets the effect for manual control. Must match one of the predefined effects. If the LEDs are already on, the effect is immediately applied. Otherwise it used when the LEDs are next toggled on. Effects do not repeat automatcally, but only run once. |
/ledcolor | RGB or Hex Color String | 0,255,0 / #00ff00 | Sets the primary LED color for the LEDs when manually controlled. |
/ledcolor2 | RGB or Hex Color String | 0,255,0 / #00ff00 | Sets the secondary LED color for some effects. Not all effects use the secondary color. |
/ledspeed | number | 1 - 10 | Sets the effect speed for manual control. Not applicable for some effects (e.g. ) |
-
Note that when
/sensoroverrideis reset from ON to OFF, the LEDs may immediately turn on if a sensor is being triggered, using that sensor’s particular effect, color and speed. -
Manual control parameters (ledeffect, ledcolor2 and ledspeed) are not retained in the configuration file and are reset upon a controller restart. When the system boots, these values are initially set to the default values for Sensor1.
Additional Commands
Unless specifically noted, these commands can be used regardless of the sensor override state. But note that some changes may not be seen until the override is turned off and a sensor triggers.
| Topic Suffix | Payload(s) | Example | Notes |
|---|---|---|---|
/brightness | number | 0 - 255 | Set the master brightness of the LEDs. If the LEDs are on when issued, the new brightness is applied immediately. Otherwise, it is used the next time the LEDs turn on. |
/sensor1state | ON/OFF | ON | Sends an ON trigger for Sensor1. Ignored if sensoroverride = ON. See notes below. |
/sensor2state | ON/OFF | ON | Sends an ON trigger for Sensor2. Ignored if sensoroverride = ON. See notes below. |
/sensor1toggle | ON/OFF | ON | Sets the Toggle Off setting for Sensor 1. |
/sensor2toggle | ON/OFF | ON | Sets the Toggle Off setting for Sensor 2. |
/sensor1dist | number | 50-1200 | Sets the trigger distance for Sensor1. Only valid for wired ToF Sensors! Ignored if wireless or PIR sensors are used. Values outside of range are constrained to 50 or 1200. |
/sensor2dist | number | 50-1200 | Sets the trigger distance for Sensor2. Only valid for wired ToF Sensors! Ignored if wireless or PIR sensors are used, or if only one sensor is defined. Values outside of range are constrained to 50 or 1200. |
/effect1 | String | In-Out | Sets the LED effect for Sensor1. Will be applied next time the sensor triggers. Must match one of the predefined effects. |
/effect1speed | number | 1 - 10 | Sets the LED effect speed for Sensor1. Not applicable for some effects (e.g. Solid). |
/effect1color1 | RGB or Hex String | 255,0,255 / (#)ff00ff | Sets the primary color for Effect1. May be specified as a comma-separated RGB string or as a Hex Color string (with our without leading ‘#’). |
/effect1color2 | RGB or Hex String | 255,0,255 / (#)ff00ff | Sets the secondary color for Effect1. Follows same payload as primary color. Ignored if active Effect1 only uses the primary color. |
/effect2 | String | Solid | Sets the LED effect for Sensor2. Will be applied next time the sensor triggers. Must match one of the predefined effects. |
/effect2speed | number | 1 - 10 | Sets the LED effect speed for Sensor2. Not applicable for some effects (e.g. Solid). |
/effect2color1 | RGB or Hex String | 255,0,255 / (#)ff00ff | Sets the primary color for Effect2. May be specified as a comma-separated RGB string or as a Hex Color string (with our without leading ‘#’). |
/effect2color2 | RGB or Hex String | 255,0,255 / (#)ff00ff | Sets the secondary color for Effect2. Follows same payload as primary color. Ignored if active Effect2 only uses the primary color. |
There are some additional notes to be aware of when attempting to control the system via MQTT commands.
Manually Controlling the LEDs via MQTT
If you want to manually control the LEDs via an external system or via automations using MQTT, you will generally follow this process:
-
Disable the Sensors (
/sensoroverride: ON)
This needs to be done or any manual changes will immediately be written by the sensor state(s). -
Take control of LEDs as desired (
/ledeffect,/ledcolor,/ledcolor2,/ledspeed,/ledstate, etc. ).
You can continue to send commands and all local sensor processing remains off. -
Re-Enable the Sensors (
/sensoroverride: OFF)
Disable the sensor override to return the system to normal operation, using the sensors. If you fail to include this step, the system remains in ‘manual’ mode and will not respond to any sensor triggers.
Additional Notes on Manually Triggering Sensors
When the system is in ‘normal’ mode (/sensoroverride: OFF), you can send a command to simulate a sensor trigger. This causes the system to act exactly as it would if the actual sensor was triggered. The only exceptions are that any debounce or cooldown settings are ignored and the command immediately exceutes the trigger operation on the primary controller. As soon as “ON” command is received, the sensor operation returns to use of the regular sensors.
Therefore, there is no need to send a separate “OFF” command. As soon as the “ON” command is processed, additional state reading revert back to the actual sensor, which will have an ON or OFF state.
Combining Multiple Commands
When using MQTT, each command must be sent to the broker indvidually with the desired topic and payload. You cannot combine multiple commands into one, such as setting the LED state, color and effect as one command. If you prefer to send a single command with multiple paramters, then consider using the HTTP API, which is the next topic.