Settings and Options (PRIMARY only)

The information in this section only applies to the primary controller. These options, which primarily deal with the ACTIVE settings, are not applicable to wireless sensor controllers. Be sure you’ve reviewed the prior topic on General System Use and understand the difference between DEFAULT and ACTIVE settings.
Active settings are found on the main page of the primary controller’s web application.
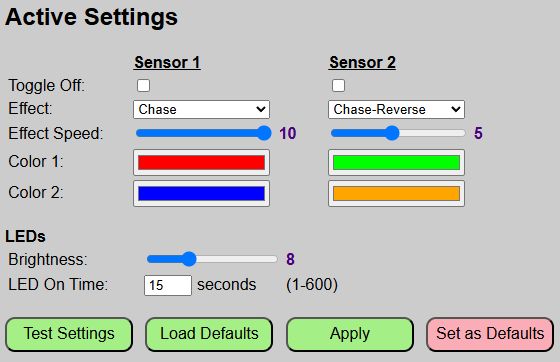
When the system first boots, the DEFAULT values are read from the saved configuration file and are also used as the initial ACTIVE settings. This means that when the main page loads immediately after boot, the ACTIVE settings will also match the saved DEFAULT values. Once you apply any changed ACTIVE settings, they will remain in effect until the controller is restarted.
LED Active Settings
Even though the LED active setting show at the bottom of the active settings section, I’m covering these options first, since it will make the sensor settings a little easier to understand.
LED Brightness
This is the brightness level used whenever the LEDs are turned on by any method (triggered by sensor, manually turned on via MQTT/API, etc.). The brightness can be adjusted from “1” to “25”. This roughly translates to brightness levels 10-250 if using MQTT/API.
Be sure your power supply (and wiring) can handle the expected current needed by the LEDs at higher brightness levels and that you’ve set the power supply max properly in the Hardware Setings
On Time
Entered in secconds, this is the time that the LEDs will remain on after all sensors report “clear”. Once the time expires, the LEDs are automatically turned off. Note that if a sensor is triggered again during this countdown period, the time resets and starts again. So the LEDs will remain on as long as one or more sensors continues to report a detected state. The valid range for on time is from 1 second to 600 seconds (10 minutes).
Sensor Active Settings
If you are using two sensors, each sensor can trigger its own LED effect, color, speed, etc. This means that you can have one sensor run an effect or pattern, but then have the other sensor run a different pattern. An example of this is shown above:
When Sensor1 is triggered, the LEDs run a chase pattern, ligthing up the LEDs in sequence from the start to the end of the strip, in a blue color at the maximum speed.
When Sensor2 is triggered, the LEDs run in the opposite direction, ligthing up the LEDs from the end to the start of the strip, this time using green and running at approximately have the speed. </i>
If you want the LEDs to behave the same regardless of which sensor triggers, just set both sensors to the same values.
If you have configured your hardware for only one sensor, then the Sensor2 fields will be hidden/disabled
Toggle Off
If you enable the Toggle Off option for a sensor, then if that sensor is triggered when the LEDs are already on, instead of restarting the On Time timer, it toggles the LEDs off. Otherwise, it triggers the LEDs to turn on like normal.
You can use this option on something like a staircase or long hallway. The best way to understand the Toggle Off setting is through an example. This assumes a staircase with two sensors, one at the bottom and one at the top.
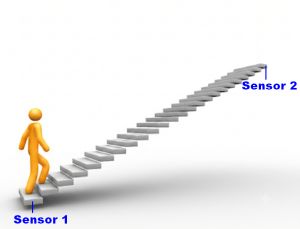
When an individual starts up the stairs, Sensor 1 triggers and turns on the LEDs using the Sensor1 ACTIVE settings for effect, color and speed.
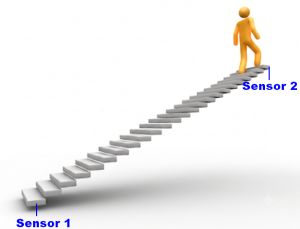
When the individual reaches the top of the stairs and triggers Sensor2, the LED behavior is different depending upon the Sensor2 Toggle Off setting:
Sensor2 Toggle Off: DISABLED
If the Toggle Off setting is unchecked, then the Sensor2 trigger will simple reset and restart the LED On Time countdown timer. For example, if you have a 30 second time-out, the timer will be reset to 30 seconds and restart when Sensor2 is triggered. The LEDs remain on until the On Time expires.
Sensor2 Toggle Off: ENABLED
In this case, when Sensor2 is triggered (and assuming the LEDs are still on), the LEDs will immediately be turned off, and any LED On Time countdown is cancelled.
If you enable the Toggle Off setting for both sensors, then the first sensor trigger will turn the LEDs on if off, and the second sensor trigger will immediately toggle the LEDs back off.
Caveats and Limitations
There are some limitations and special use cases where the sensors may not behave as desired.
-
Short LED On Time: If the LED ON Time expires before the second sensor triggers, LEDs will shut off. Using the above example, if the On Time is set to a short value, say 5 seconds, and it takes someone longer than 5 seconds to traverse the stairs, the LEDs will turn off while the individual is still on the stairs and therefore, the LEDs would turn back on when Sensor2 triggers.
-
PIR Cooldown Period: If your PIR sensors have a lengthy cooldown period, a second sensor trigger may not behave as expected. Again, using the stair example, say Sensor1 (a PIR sensor with a 15-second cooldown period) with the Toggle Off setting enabled. Someone begins up the stairs, Sensor1 is triggered and the LEDs turn on. But after a few steps, the individual turns around and heads back down the stairs. If Sensor1 is still in the cooldown period (showing active or detected), then when the individual crosses the field of view of Sensor1, it is already in a ‘detected’ state, so it will not toggle off the LEDs. This is more prevalent with PIR sensors due to their native cooldown period as opposed to ToF sensors, which do not have this cooldown.
-
Multiple people on stairsWhat happens if multiple people are using the stairs simultaneously?
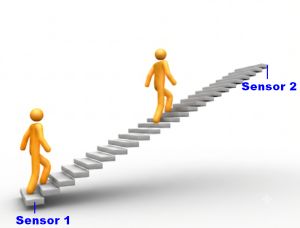
This depends on how you have your sensors configured. If you have Toggle OFF enabled, then the first individual triggers the LED when they enter the bottom of the stairs. But while the first individual is still on the stairs, a second individual triggers Sensor1. Since Toggle Off is ENABLED, the LEDs immediately turn back off. Then when the first individual triggers Sensor2, the LEDs turn back on. Finally, when the second individual exits the stairs at the top, the LEDs are once again toggled off.
If the sensors have Toggle off DISABLED, then the first individual would trigger sensor one and the LEDs would come on. When the second individual triggers Sensor1, the LED On Time countdown is simply restarted and the LEDs remain on. Similarly, as each individual exits at the top, triggering Sensor2, it doesn’t toggle the LED state (assuming they are already on) but instead restarts the LED On Time countdown. Once all sensors have been cleared for the LED On Time, the LEDs will automatically turn off.
So based on your particular project and needs, you may need to experiment with the LED On Time, Toggle OFF settings, Cooldown period (for PIR sensors) to get the desired behavior. There may not be a ‘perfect’ option for dealing with multiple individuals since the system has no way to keep track of the number of indviduals on a staircase (or say, in a long hallway). Primarily this is because if Sensor1 is triggered a second time before Sensor2 gets triggered, it could be due to a second individual starting up the stairs (2 people on stairs) or it could be because the first individual simply changed their minds, turned around and exited the stairs at the bottom (in this case, there are now zero people on the stairs). The system tries to offer a series of setting to cover most situations, but you may have to opt for the best non-perfect solution available.
Effects
The system currently offers a handful of different effects and more are occasionally added through firmware updates. If more than one sensor is defined, each can have its own associated LED effect. This means that triggering Sensor1 can have a given effect (and related color/speed), but triggering Sensor2 can result in a completely different effect (and color/speed). I’ll provide a very brief description of the available effects at time of publication, but the best way to see the effects is to simply try them out on your own build.
-
Solid: Turn on all LEDs simultaneously in a single color. Speed and Color 2 are ignored.
-
Fade: The LEDs gradually turn on, starting at a dim level and finishing at your set LED Brightness level, using Color1. The speed controls how fast or slow the fade occurs. Note that this works best when your LED Brightness level is set at 10 or above.
-
Chase: Light up each LED in sequence, starting at the beginning of the LED strip (where the data wire connects) using Color 1. Speed controls how fast the LEDs light up. Color 2 is ignored.
-
Chase-Reverse This is just the opposite of Chase. The LEDs light sequentially but in reverse order, starting at the end of the strip back to the beginning using Color 1. Speed controls how quickly the LEDs light up.
-
In-Out: The LEDs begin in the center of the strip and radiate squentially out to the opposite ends of the LED strip, applying Color1 to one direction and Color2 in the other. Speed controls how fast the LEDs light up.
-
CirssCross The LEDs start at both ends of the strip, using Color1 at one end and Color2 at the other, sequentially lighting up until they meet in the middle of the strip. At this point they “criss cross” and continue to the opposite end of the LED strip. Speed controls how fast the LEDs light up.
-
Segments The Number of LEDs is divided into 5 equal segments (with any remainder included in final segment). Each segment is lit simultaneously, starting at the beginning of the strip using Color1. Each segment is then sequentially turned on. This is similar to “Chase” but turns on blocks of LEDs simultaneously instead of indvidual LEDs. Speed controls how quickly each segment is lit.
-
Segments-Reverse Identical to Segments, except the last segment (end of strip) is lit first, working back towards the beginning of the strip.
-
Segments2 Works just like Segments, but instead of just using Color1, this version also uses Color2, alternating the color between segments.
-
Segments2-Reverse Identical to Segments2, but segments light up in reverse order.
🔁 Effects are Non-Repeating
Effects do not repeat or “loop”. Once an effect completes, the LEDs simply remain on until an additional sensor trigger or command changes their state.
Effect Speed
This controls how fast a given effect occurs. This is a ‘relative’ setting, meaning that a given speed might result in a “faster” or “slower” lighting of the LEDs based on which effect is used. The valid speed range is from 1 to 10.
If an effect doesn’t use speed (e.g. “Solid”), then the speed setting is ignored and changing it has no impact on the LEDs.
⚠️ Effects are “Blocking”
When an effect is rendering on the LED strip(s), all other features and processing are “blocked” and will not immediately execute but, depending upon the function, may instead “queue up” and execute after the rendering completes. This includes functions such as:
- Additional Sensor Triggers
- LED On Time Countdown Timer Start
- Any settings changes
- MQTT/API Commands
This means that if you are running an effect at a slow speed and have a large number of LEDs that takes 10 seconds to render on the LED strips, during this 10 seconds, additional triggers of the same or different sensor(s) may be discarded or queued up for execution after the effect completes. Also note that the LED On Time does not begin until after the LED effect has completed. This means that if you have a 120 second LED On Time, this timer will not start (or be reset by additional sensor triggers) until after the LED effect has completely rendered on the LED strip(s).
Keep this in mind when using slower effect speeds with larger numbers of LEDs. In effect, you should consider the system “unresponsive” to additional changes or updates until the LED effect completes. It is possible to change the speed range scale if needed. See the Initial Hardware Configuration for more details.
Effect Color 1 and Color2
Some effects only use Color1 (e.g. Solid, Chase, Segments), while others utilize two colors (e.g. In-Out, CrissCross, Segments2). If an effect only uses one color, then any Color2 setting is simply ignored.
To select a color, simply click in the color box.
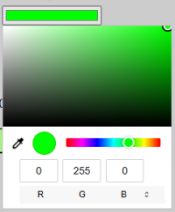
You can select a color in a variety of ways using this color picker. First you can select a hue from the bar and click a particular color in the large color box. You can also enter a color value in RGB value or by clicking the small arrows next to the R G B boxes toggle this setting to HSL, then HEX and back to RGB, allowing you to enter colors in a variety of methods. You can even use the eyedropper to select a color from anywhere on your local desktop.
Testing, Applying or Saving Your Settings

Note that changing any individual settings does not actually change any system seetting or options. You must use one of the buttons to enact any changes. The button determines whether the any setting changes are used for testing, ACTIVE settings or applied as the new system defaults.
Test Settings
Clicking the Test Settings button will put the system into a special test mode using your selected setttings. Note that other fields and buttons are locked out during test mode and other certain operations (like MQTT updates) are suspended when the system is in Test mode. This is noted by a message on the app web page.
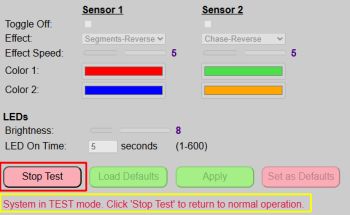
You can now test the system by triggering the sensors and seeing the currently selected options. The system remains in Test mode until you click “Stop Test”. At this point, the system is returned to normal operation, using the previous ACTIVE values for the LEDs and sensors. You can repeat this process numerous times to try out different settings without impacting the actual active settings.
Load Defaults
If you click this button, the DEFAULT settings are read from the configuration file and all fields are set to the values from the configuration. Note that these settings are just loaded into the interface. You must then use either the Test or Apply button to use the settings.
Apply
This will apply all the LED and Sensor Effect settings and make them the current ACTIVE settings. The active settings will remain in effect until changed again or until the system restarts, at which point the DEFAULT values are loaded into the ACTIVE values.
Set As Defaults
This will make the currently selected settings the new DEFAULT values that are loaded each time the system reboots or power up. You will be prompted to confirm this choice and after doing so, the settings are saved to the configuration file, the controller will automatically reboot and your new settings will be loaded and ACTIVE.
This covers most of the standard use and operation of the system. Next, I’ll cover a few available controller commands. Unlike the settings and options on this page, these controller commands apply both to the primary controller and any wireless sensor controllers.