Effect Rendering
![[Partitions image]](images/advancedeffect_01.jpg)
The system is delivered with a number of LED patterns or effects that can be assigned to the various sensors to use when a sensor is triggered. It’s also possible to use these effects when “manually” controlling the LEDs.
💡 Advanced Users Only
This section contains a lot of “techno-babble” that describes how effects are drawn on the LED strips. If you are just using the system with built-in effects, you can safely ignore this topic.
However, if you are looking to add your own custom effect, which is covered in a separate topic, understanding how these work “under the hood” may be beneficial. Or maybe you are just a tech junkie that just wants to understand how to control addressable LED strips!
Addressable LEDs and the FastLED Library
The PRIMARY controller uses the FastLED library, however most other libraries (like NeoPixelBus) work and treat the LEDs in a similar manner (only the syntax is slightly different). The LED strip is controlled, and effects are created, by addressing the individual LEDs by number.

The first LED in the strip (where the incoming data line is connected) is considered LED “0” (LED number is zero-based). LED “5” is actually the 6th physical LED. The last LED in the strip is the total number of LEDs minus 1.
FastLED allows you to send multiple configurations to the LED strip. When all the configuration data has been sent, you issue a FastLED.show() to actually render all the configuration details at once.
For example, to only turn on the 1st, 5th and 10th LED each in a different color, you might use code similar to:
LEDs[0] = ledColor1;  //Remember that the LED count is zero-based, so the first LED is "0"
LEDs[4] = ledColor2;
LEDs[9] = ledColor3;
FastLED.show();
Note that since FastLED doesn’t actually perform any action until the .show() function is called, all three LEDs will light up in their respective color simultaneously, not one after the other.
To begin creating patterns or sequences, looping can be used. Here is the core code for the built-in Chase effect, which lights up the LEDs in sequence from the first LED to the last:
  for (int i=0; i < (numLEDs); i++) {
    LEDs[i] = ledColor;
    FastLED.show();
    delay(delayTime);
  }

In this case, a loop is executed from 0 to numLED - 1 (since the LED position is zero-based). Since the FastLED.show() is executed inside the loop, each individual pixel is lit up individually, followed by a small delay. Without this delay, the loop would run so fast that the effect would be inperceptible. Changing the delay value determines how fast the effect is executed. More on the speed calculations and delays under the next topic Effect Speed Calculations
Similarly, if the FastLED.show() statement was moved outside the loop, the LEDs would not light up until all data has been received. It would then light up all LEDs simultaneously and would basically replicate the “Solid” effect:
  fill_solid(LEDs, numLEDs, ledColor);
  FastLED.show();
This would result in the exact same effect as “Chase” if the FastLED.show() was moved outside of the loop in the Chase function.
Using the LED number and loops, it is possible to create an unlimited number of effects.
💡 Practical Limits on Effects
While there aren’t any “theoretical” limits on the number or types of effect, there are some practical limitations based on how the firmware works. First, rendering effects is a “blocking” operation, which means the system will not respond to other event or triggers while the effect is rendering.
All effects should take no longer than 10 seconds at the slowest effect speed. Longer rendering times not only leaves the system unresponsive to additional sensor triggers but could trigger a watchdog reset on the controller, resulting in a system reboot.
The above practical limit is also why effects are only rendered once and do not repeat. You can learn more about some of the limitations and best practices for effects in the next topic on
Splitting the Signal
You can control more than one LED simultaneously using the Primary controller. This may be desirable for using a separate LED strip on both side of a staircase or both sides of a long hallway. To do this, the single LED data line from the controller is “split” and sent to both strips.
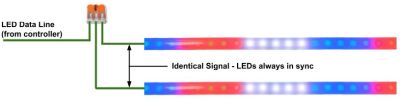
Complete wiring diagrams available in the Build Guide
When the controller sends a signal to the LEDs, this signal is split and sent to both strips simultaneously. This means if I use a command such as:
  LEDs[4] = color1;  //zero-based so this turns on the 5th LED
  FastLED.show();
Then the 5th LED on BOTH LED strips will light up simultaneously. The good news is that the two LED strips will alway remain perfectly in sync (since both get the same identical data). The drawback is that you cannot run different effects on the individual strips at the same time.
👀 Number of LEDs - Settings
Splitting a single data signal between two LED strips is why you only enter the number of LEDs on ONE LED strip in the configuration settings. As far as the controller is concerned, it is only speaking to a single LED strip. The signal is split after leaving the controller.
❗ Number of LEDs - Power Supply (Max Amp Draw)
While the data signal may only address the number of LEDs in a single strip, when determining the power supply size and Max Amp Draw setting, the TOTAL number of LEDs across all strips needs to be used. The power supply must be appropriately sized to provide adequate current to ALL LEDs in the system.
More information on effects and how they work can be found in the advanced topic Adding New Effects. But before moving on to that topic, we need to understand how the speed and delay calculations work.