Creating New Effects (Primary Only)
![[Partitions image]](images/advancednew_01.jpg)
With the understanding from the previous topics Effect Rendering and Speed Calculations, you have the necessary information to create your own effects. This topic shows the steps required to add an effect to the controller’s code.
Yes… currently this does mean that you are going to need to modify the source code and compile your own firmware. Future updates may allow effects to be defined and stored in a separate configuration file so that code modifications aren’t necessary. But for now, you have to modify the source and compile your own version.
💻 Arduino IDE
The topic assumes you have an understanding on configuring and using the Arduino IDE. This includes adding ESP32 board support and adding libraries. You can review some of the Arduino requirements for editing the source code in the topic Modifying the Firmware
Effects are defined and executed from the PRIMARY controller. This means that you will need local copies of the primary controller’s source code:
standalone_controller.ino- This is the file to be editedhtml.h- This file won’t be modified, but is required to compile the firmware
These files can be obtained from the Standalone Stair Controller repository.
Overview of Steps
To add a new effect, we need to complete the following steps in the source code:
- Expand the Effects Array
- Add Effect Name to defineEffects()
- Add your new effect function
- Update case statements in toggleLights() and getEffectName()
Global Variables and Effect Function Parameters
Your effect will likely need to know a little bit about the current system, such as the total number of LEDs, to implment your effect. Some of these variables are defined globally, others can be passed as parameters to your effect function. This section lists the variables and parameters you are most likely to use.
Effect Function Parameters
When the system calls an effect function, it can pass up to three parameters, based on the current values of the sensor settings:
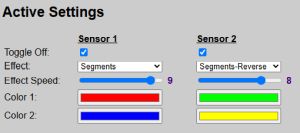
If Sensor1 was triggered, the colors and speed from Sensor1 are sent. If Sensor2 was triggered, its paramaters are passed instead. If the system is in manual override mode, then the manual colors and speed will be sent. In essence, your effect doesn’t need to care about how the system was triggered… it only needs the colors and speeds to use for your effect.
void effectName(CRGB color1, CRGB color2, byte speed)
color1: The Primary Color, passed from the sensor’s active valuecolor2: The Secondary Color, passed from the sensor’s active valuespeed: The Effect Speed, passed from the sensor’s active value
Your effect function only needs to accept the parameters it needs. For example, if your effect will only use one color, you can simply omit color2 from your function’s parameters:
void effectName (CRGB color1, byte speed)
If fact, if your effect is going to use ‘fixed’ colors, you don’t have to accept colors at all. For example, say you are adding a “Candy Cane” effect that will always use Red and White for its colors. Then you would not need any color parameters and would instead set the colors in your effect function. Similarly, if your effect doesn’t require speed (e.g. “Solid”, “Fade”), then you don’t need the speed parameter. So for our fictitional ‘Candy Cane’ effect, if the LEDs are just supposed to all come on simutaneously (no pattern), but in fixed alternating colors of red and white, the effect function doesn’t need parameters at all:
void effectCandyCane()
There is at least one other globally defined variables you will likely need for your effect:
numLEDs: The total number of LEDs, as defined in the hardware setup.
There are a plethora of other global variables that you can use if needed, and all these are defined (and commented) near the top of the code.
🔺 Using Global Variables
While your custom effect function can use any global variable, it should not change the value. The system handles things like the current state of the LEDs, timers and other routine processes. If you change the value of a global variable in your function, unexpected results may occur and in extreme situations, your board may even crash or reboot.
CRGB Color Types
You may have noticed a non-standard varaible type for the color parameters: CRGB. This is a special variable type used by the FastLED library. The FastLED library also has a number of ‘predefined’ colors, that can be directly used for any color parameter:
CRGB::Red
CRGB::Green
CRGB::Blue
… etc.
In fact, there are over 140 predefined CRGB colors available in the FastLED library. To see a full list, visit the FastLED Library Reference Guide.
If you are using the system parameters for color in your function, you don’t need to worry about the color type. The firmware has handled that for you. However, if you need colors defined other formats, such as Hex (#ff0000) or RGB (255,0,0), the firmware already has conversion functions available so you don’t need to do any conversions in your effect function:
| Function | Accepts | Example | Returns |
|---|---|---|---|
CRGB hexToCRGB(hexString)Converts Hex Color to CRGB Color | Hex Color String | #ff0000 | CRGB Color (red) |
CRGB rgbToCRGB(red, green, blue)Converts RGB Colors to CRGB Color | Three numerics (0-255) | 0, 255, 0 | CRGB Color (green) |
crgbToHex(CRGB Color)Converts CRGB Color to Hex Color String | CRGB Color | CRGB::Red | #ff0000 |
crgbToRgb(CRGB color, &r, &g, &b)Converts CRGB Color to RGB R, G, B values | CRGB Color | CRGB::Green | r=0 g=255 b=0 |
Additional color conversion and handlers are available, such as converting from Hex to RGB. These can be found at the very bottom of the .ino source code.
Adding An Effect
The best way to show the process for adding a new effect is by example. So for this fictional effect, which we’ll call ‘Out-In’, will illuminate the LED strip starting at each end. Color1 will be used for the start of the strip and Color2 will be used starting at the end. The LEDs will light up in sequence, moving towards and meeting in the middle of the strip. This is actually just the ‘reverse’ of the included ‘In-Out’ effect.
Increase the Effect Array
Near the end of the global variables defined at the top of the source code, locate the section for the Effect Array:
// ===============================
//  Effects array
// ===============================
int numberOfEffects = 10;
String Effects[numberOfEffects];
Increase the numberOfEffects by one for each effect added:
int numberOfEffects = 11;
Add Effect Name to the Effect Definitions
Locate the following function:
//=================================
// LIGHT AND EFFECT FUNCTIONS
//=================================
// -----------------
//  Define Effects
// -----------------
//  Increase array size above if adding new
//  Effect name must not exceed 15 characters and must be a String
void defineEffects() {
  Effects[0] = "Solid";
  Effects[1] = "Chase";
  Effects[2] = "Chase-Reverse";
  Effects[3] = "In-Out";
  Effects[4] = "CrissCross";
  Effects[5] = "Segments";
  Effects[6] = "Segments-Reverse";
  Effects[7] = "Segments2";
  Effects[8] = "Segments2-Reverse";
  Effects[9] = "Fade";
  Effects[10] = "Out-In";   //Add your new effect
}
Add your new effect name to the end of this, increasing the array number by one:
Effects[10] = "Out-In";
Note that the effect name is limited to 15 characters!
Create and Add the Effect Function
Now we need to add the function that actually creates the desired pattern and effect.
void effectOutIn(CRGB ledColor1, CRGB ledColor2, byte speed) {
  //Get speed from function calculation
  uint32_t totalTime = getTargetDuration(speed);
  uint32_t delayTime = totalTime / (startPixel + 1);
  if (delayTime < 1) delayTime = 1;

  int midPixel = numLEDs/2;
  int mod = numLEDs % 2;
  int upCounter;
    //adjust for 0 based array
  midPixel = midPixel - 1;

  for (int i=0; i < (midPixel); i++) {
    //Loop through LEDs lighting from each end in different colors, meeting in the middle
    LEDs[i] = ledColor1;
    LEDs[(numLEDs - 1) - i] = ledColor2;
    FastLED.show();
    delay(delayTime);
  }

  if (mod != 0) {
    //If number of LEDs is odd, light the remaining center pixel
    LEDs[midPixel] = ledColor;
  }
}
This is a basic example, but create whatever effect you like.
Update Case Statements in getEffectName() and ToggleLights()
getEffectName()
The getEffectName() function returns the exact matching effect name from a parameter that may be in lower, upper or mixed case. This is primary used for the API and MQTT parameter processsing.
String getEffectName(String effect) {
  String retVal = "Solid";
  if (effect.equalsIgnoreCase("chase")) {
    retVal = "Chase";
  } else if (effect.equalsIgnoreCase("chase-reverse")) {
    retVal = "Chase-Reverse";
  } else if (effect.equalsIgnoreCase("in-out")) {
    retVal = "In-Out";
  } else if (effect.equalsIgnoreCase("crisscross")) {
    retVal = "CrissCross";
  } else if (effect.equalsIgnoreCase("segments")) {
    retVal = "Segments";
  } else if (effect.equalsIgnoreCase("segments-reverse")) {
    retVal = "Segments-Reverse";
  } else if (effect.equalsIgnoreCase("segments2")) {
    retVal = "Segments2";
  } else if (effect.equalsIgnoreCase("segments2-reverse")) {
    retVal = "Segments2-Reverse";
  } else if (effect.equalsIgnoreCase("fade")) {
    retVal = "Fade";
  } else if (effect.equalsIgnoreCase("out-in")) {   //Add your function in an addtional 'Else If'
    retVal = "Out-In";
  }
  return retVal;
}
MQTT and the HTTP API normally uses all lower case parameters or payloads. To allow your effect name to be properly recognized in the code (which is case sensitive), we use a simply function to convert lower case parameter or payload to the matching effect name.
Place your effect name, in all lower case, within an equalsIgnoreCase("lower-case-name") and then use the exact matching name for the retVal.
toggleLights()
This function actually calls the effects, based on the passed paramenter. To allow your effect to be called from a sensor or manual trigger, it must be added to this function. The top portion of this function (omitted from sample below) determines the proper colors and speed settings depending upon trigger source. You only need to locate the if-else if block and add your new function.
    if (useEffect == "Solid") {
      effectSolid(color1);
    } else if (useEffect == "Chase") {
      effectChase(color1, speed);
    } else if (useEffect == "Chase-Reverse") {
      effectChaseReverse(color1, speed);
    } else if (useEffect == "In-Out") {
      effectInOut(color1, color2, speed);
    } else if (useEffect == "CrissCross") {
      effectCrissCross(color1, color2, speed);
    } else if (useEffect == "Segments") {
      effectSegments(color1, speed);
    } else if (useEffect == "Segments-Reverse") {
      effectSegmentsReverse(color1, speed);
    } else if (useEffect == "Segments2") {
      effectSegments2(color1, color2, speed);
    } else if (useEffect == "Segments2-Reverse") {
      effectSegments2Reverse(color1, color2, speed);
    } else if (useEffect == "Fade") {
      effectFade(color1, speed);
    } else if (useEffect == "Out-In") {   //Add your new effect name and function here
      effectOutIn(color1, color2, speed);
    } else {
      effectSolid(color1);
    }
Once the above code modifications are complete and you compile/flash the modified firmware to the PRIMARY controller, your new effect will be available for selection from the Effect drop down lists within the web app or via the HTTP API or MQTT.