Daily Operation & Configuration Issues
![[Troubleshooting image]](images/troubleoperation_01b.jpg)
System Stops Functioning / Can’t Access Web Interface
If a previously working system suddenly stops responding, the first step is to try restarting the system. This includes both the PRIMARY controller and any wireless sensor controller(s) if used. If that doesn’t resolve the problem, check the following:
Lost Connectivity
The system requires WiFi for communication. In addition to providing access to the web interface for your controller(s), WiFi is used for wireless sensor communication and API/MQTT. If any controller drops off the network, the system may become unresponsive or misbehave.
If a reboot does not re-establish connectivity, you may need to move or boost the WiFi in the controller area. If this isn’t possible and the system is in a weak WiFi area of your home, you may need to consider using a different ESP32 that accepts an external antenna, as the integrated PCB antenna on standard ESP32 boards isn’t that great.
Lost connectivity can also be a result of a changed IP address.
IP Address(es) Changed
This is more likely a cause when using wireless sensors. Wireless sensors send their signal to the PRIMARY controller based on the IP address. If the IP address of the PRIMARY controller changes, the wireless sensors will not be able to communicate until the sensor’s configuration is updated.
⚠️ Using Static/Reserved IP Addresses
It is strongly recommended that you assign a static or DHCP reserved IP address for at least the PRIMARY controller. This will prevent your router from handing out a different IP address that will break the system. If possible, use reserved IP addresses for any wireless sensors as well, so the address to the web interfaces will always be consistent.
If you cannot reach the web interface of any controller, a changed IP address may also be the culprit. If necessary, check your router to see if a new IP address is in use.
LEDs Do Not Turn On/Off As Expected
If the LEDs do not turn on as expected when a sensor triggers, or the LEDs simply remain on and never turn back off, there are a number of potential causes for this behavior:
Check Sensor Override
Be sure the sensor override has not been enabled. The sensors will not cause a trigger nor will the LEDs automatically turn off when the ‘Sensor Override’ switch as been enabled.
Assure Nothing is Blocking Sensor
Recall that when the LEDs are triggered by a sensor, the standard LED On Time countdown does not begin until all sensors report “Clear”. If something is still triggering a sensor (e.g. an object within the FOV), then the LEDs will just remain on. If using wireless sensors and you have also enabled the ‘Use Onboard LED’ option, you can check the ESP32 for the sensor to see if the blue LED is lit, which indicates the sensor is still reporting a ‘detected’ state.
System Using Wrong Colors/Effects
If the system is triggering as expected, but the LEDs are showing different colors and/or an effect than expected, this is likely an issue with, or a misunderstanding about, the system default vs. active settings.
Default vs. Active Settings
The topic on General System Use covers the differnce between “Default” settings, loaded at boot time, and “Active” settings that are currently in use. If the LEDs were showing a certain effect, but then suddenly showing a different effect and/or colors, this could be caused by an unexpected system restart.
- Any time the system restarts for any reason (intentional reboot, power outage, controller crash, etc.), the current active values are replaced with the default boot settings.
- A third party system may have seen new settings via the API or MQTT. If your effects/colors are changing, check that any integrated systems, such as Home Assitant aren’t sending commands that change a sensor’s effect/color settings.
The ‘Config Dump’ and ‘System Information’ (PRIMARY controller only) can be a useful source for troubleshooting. The ‘System Information’ can be especially helpful for this issue as it shows both the Default and Active values. If you find that the Default and Active settings match (and you know you previously change the Active values), it is an indication that an unexpected restart of the controller occurred.
Ghost Triggers (LED randomly turning on)
This issue is much more prevelent with PIR sensors, but can also occur with ToF sensors. “Ghost” triggers are when the LEDs seem to just randomly turn on… as if a “ghost” walked in front of the sensor. There can be a number of issues that cause this behavior.
Electomagnetic Interference (EMI)
Wiring runs, especially longer runs, can be susceptible to interference from other nearby electronic sources. This can case a brief spike in the signal, which the controller reads as a ‘detected’ state and therefore toggles on the LEDs. The Build Guide covers some ways where you can boost or strengthen the signal for longer wiring runs. Or you may be able to use the Debounce setting (covered below) to eliminate these short spikes that result in the ghost triggers.
Cobwebs, Spiders and other Physical Objects
This one is more likely to impact ToF sensors over PIR. Recall that unlike PIR sensors which detect heat, a ToF sensor is measuring distance to pretty much any object that reflects its signal. A stray cobweb that drifts in and out of the detection range can cause the sensor to trigger the LEDs. A spider (or other small insect) may also crawl across the sensor or across its path and trigger the LEDs.
If the sensor’s position or alignment changes (e.g. the sensor gets bumped… mounting tape comes loose, etc.), a ToF sensor may start picking up a nearby wall or floor that it didn’t “see” prevously. This would result in a continous detected signal from the sensor.
Signal Variances (ToF Sensors)
By their nature, ToF sensors will have some natural “bounce” in their signal and therefore the reported distance. This means two consecutive readings may be 10-15 mm (~ 1/2”) apart. This is just how the sensors work. You can see this “bounce” using the ToF Calibration feature. But if you set your trigger distance too close to a fixed object, the natural ‘bounce’ in the sensor may detect the fixed object at a distance within your trigger range, thereby causing the sensor to occasionally trigger and turn on the LEDs.
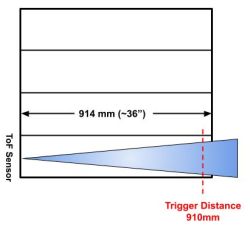
Take this example, where the distance between the sensor and the stringer on the stair case is 914 mm (~36”). When no one is on the stairs, the sensor is always going to report the measured distance to the opposite stringer. The LEDs will not trigger, however, until the measured distance is less than the configured “trigger” distance. But just due to the ‘bounce’ of the signal, the sensor may return a distance less than the trigger distance, causing the LEDs to turn on.
Sensor Readings (clear staircase):
- 914
- 922
- 916
- 908 - TRIGGERS LEDS
- 918
- 924
- 909 - TRIGGERS LEDS
To resolve this, we can just slightly shorten the trigger distance to allow for some “bounce” in the distance, yet still triggering when any one steps on the stairs.
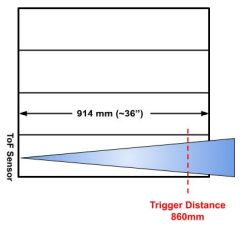
In this case, the trigger distance has been shortened by only around 2” (~55 mm). But now if the sensor reports those same exact numbers, the LEDs will not be triggered.
Sensor Readings (clear staircase):
- 914
- 922
- 916
- 908 - No longer triggers (greater than 860)
- 918
- 924
- 909 - No longer triggers (still greater then 860)
Just by shortening the trigger distance slightly, we eliminated the two “ghost” triggers in the first example. Yet anyone that steps on the stairs will still trigger the sensor since the distance will fall under the trigger distance.
Debounce Setting (Primary Only)
This is probably more useful for PIR sensors, but may be used on ToF sensors as well. Regardless of sensor type(s), used, you can set a global ‘debounce’ time. This means that the sensor must continue to report a “triggered” signal for this length of time before it is considered “ON”. A momentary interruption or spike in a signal normally only lasts for a few milliseconds. By using a ‘debounce’ setting, we can eliminate these “spikes” by saying the signal must remain in the detected state for a given time.
The flip side of this is that the sensor won’t actually trigger the LEDs to come on until this time as elapsed. For this reason, only set a debounce time if needed to eliminate ghost triggers. Even then, keep the time as short as possible, ideally less than 100 ms. The debounce time has a hard upper limit of 1000 ms (1 second).