Initial Setup & Connectivity Issues
![[Troubleshooting image]](images/troublesetup_01.jpg)
This section covers the initial flashing of the binary firmware and the onboarding steps. If you are attempting an upgrade of existing firmware or are trying to flash source code from an IDE, please refer to the Firmware Updates or Advanced Technical Information sections instead.
Installation Issues
Getting the firmware onto the ESP32 is usually the hardest part. If the computer and the controller aren’t talking, check these common culprits.
No COM Port Found
When you connect your standalone ESP32 (Primary or Wireless Sensor controller) to your PC, you must select a COM port. If no new port appears, you are likely missing the USB-to-Serial drivers.
💡 Note
These drivers are provided by third parties. Use caution when downloading and installing files. If the standard drivers fail, check your PC manufacturer’s site (especially for Lenovo laptops).
- CP2012 Drivers – Windows and Mac.
- CH342, CH343, CH9102 Drivers: Windows | Mac
- CH340, CH341 Drivers: Windows | Mac
If the driver pages appear in Chinese, right-click and select “Translate to English” in your browser, or look for the “down arrow” (↓) download button. I did not develop nor am I reponsible for these drivers.
ESP32 Will Not Connect
If the drivers are installed but the board won’t connect, you may need to perform the “Boot Button Dance” to force the board into flashing mode:
- Hold down the BOOT button on the ESP32.
- Apply power (plug in USB) or press the EN/RESET button while still holding BOOT.
- Release both buttons simultaneously.
Flash Succeeds, but no Hotspot Appears
If the flash finishes but you don’t see an onboarding access point, the flash was likely incomplete or corrupt. Erase the flash and try again. If the problem persists, try a different utility:
- ESPConnect (Recommended) – Requires a Chromium-based browser and internet connection.
- ESPHome Web Flasher – A reliable desktop alternative.
- NodeMCU PyFlasher – Use as a last resort (Windows only).
If all else fails, you may need to try compiling and flashing the source code from the Arduino IDE. It is possible that there is a compatiblity issue with your particular ESP32. See Modifying the Firmware for more information on using the Arduino IDE to flash the firmware.
Onboarding Issues
Once the flash is successful, the controller broadcasts a Wi-Fi hotspot. You should see a network named: STAIR_LEDS_AP or WIRELESS_SENSOR_AP (depending upon the controller type).
- Check the Network: Ensure your phone or laptop is searching on the same Wi-Fi frequency (2.4GHz).
- Proximity: The ESP32 doesn’t have the broadcasting power of a high-end router. Stay in the vicinity of the controller during this process.
- Wait for it: It can take 2–3 minutes for the hotspot to initialize. If it never appears after a power cycle, refer back to the flashing troubleshooting above.
Obtaining the Controller IP Address
The onboarding process will show you the newly assigned IP address if it successfully joins your WiFi.
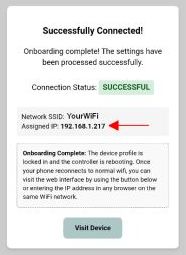
However, if you missed noting the new IP address or if you disconnected your device from the Hotspot before the onboarding completed, you can still use your router to get the IP address.

If supported by your router, the Hostname should match the Device Name you assigned during onboarding.
💡 Static or Reserved IPs Recommended
As covered in the Onboarding Topic,assigning a static or DHCP reservation for your device is recommended. This is especially if using wireless sensors, as these use the IP address of the Primary controller for communication. If the IP address of the Primary controller changes, the system will cease operation until the wireless sensor(s) are reconfigured for the new Primary’s IP address.
Even if using wired sensors and the IP address of the controller changes, it changes the IP address you use to access the embedded web application. If your system suddenly stops working or you can no longer access the web interface, check your router to assure the controller did not get assigned a new IP address.