Setting and Editing Alarms

Once you have Setup your Sound Library and Configured Alarm Options, you can begin scheduling alarms. There are three primary ways to manage your schedule: the Web App, the Touch Panel, and external system integrations.
1. Via the Web Application
The alarm scheduling interface is located on the lower half of the Alarms page (accessible via the Display menu).
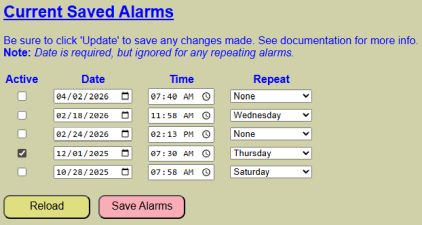
You may define up to five simultaneous alarms. Each slot contains the following settings:
- Active: Use this checkbox to enable or disable an alarm without deleting its settings.
💡 Tip: Non-Repeating Alarms
For one-time alarms, the “Active” flag may automatically uncheck itself once the alarm sounds, as the event has passed. - Date: Required, but only used for one-time (non-repeating) alarms. You can set alarms days, weeks, or months in advance. Click the small calendar icon to display a date picker or manually enter a date in mm/dd/yyyy format. If creating a repeating alarm, just select the current date.
- Time: Click the clock icon to use the time picker. Ensure you select the correct AM/PM toggle. Or manually enter time in hh:mm AM/PM format.
- Repeat: Choose from None, Single Day, Weekdays (M-F), or Weekends (Sat/Sun). Recurring alarms ignore the Date field and run indefinitely until deactivated.
💡 Tip: One-Time vs. Repeating
Setting a repeating alarm is a great way to ensure you don’t forget that 7:00 AM Monday meeting. Just remember to check your settings before a holiday! There is a unique kind of morning frustration that comes from being woken up by a perfectly functioning “Weekday” alarm on a Friday you took off for vacation.
Controls
- RELOAD: Discards unsaved changes and pulls the current schedule from the controller.
- SAVE ALARMS: You must click this to commit changes. A confirmation message will appear to the right of the list upon success.
💡 Note: No Reboot Required
Unlike system-level changes, saving alarms takes effect immediately. No controller restart is necessary.
2. Via the Touch Panel Display
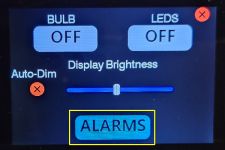
The touch interface, if enabled, allows you to manage your alarms directly from the bedside.
- Tap the Gear Icon (⚙) on the main clock display.
- If the screen is dimmed, the first tap will “wake” the display to its default brightness.
- Tap the Alarm Button at the bottom of the settings menu.
❗ HIGH PRIORITY: Alarms Disabled During Edit
For safety and processing stability, active alarms will not sound while you are navigating the on-device settings menus. To prevent accidentally missing a future alarm, the settings menu will automatically time out and return to the clock after 10 seconds of inactivity.
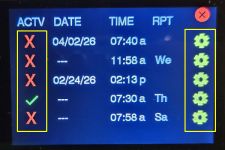
The Alarm List
The listing page shows all five slots. You can quickly toggle the ACTV (Active) state by tapping the X or ✔ icons.
Editing an Alarm
To modify a specific alarm, tap the Gear Icon (⚙) for that slot. This opens the Alarm Edit page.
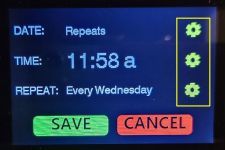
Edit the Date, Time, and/or Repeat settings by clicking the corresponding Gear Icon (⚙).
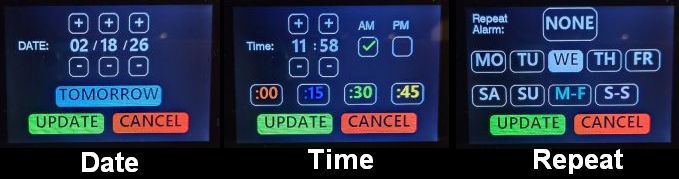
- Date/Time Pages: Use the (+) and (-) buttons to adjust values. Use the TOMORROW or :00/:15/:30/:45 shortcuts for faster entry and less tapping.
- Repeat Page: Tap the desired frequency. Note that currently, you can only select one repeat value per alarm slot.
- If you need an alarm that repeats on two different days, say Tuesday and Thursday, currently you must set these up as two different alarms. This may change in a future update.
⚠️ Important: Saving on Touch
Clicking UPDATE within the Date or Time sub-menus only updates the temporary “Edit” screen. You must click the final SAVE button on the main Alarm Edit page to write the changes to the system memory.
Confirm Saved Alarm
When clicking save from the alarm edit page, your alarm will immediately be saved and made active by default. But you can tap/toggle the active status from the alarm listing page. If there are any issues with saving your alarm, the display will show:

⚠️ Important:
In the unlikely event you receive the above message, dismiss with the confirm button and use the web application to verify/update your scheduled alarms.
3. Via External Systems
For advanced automation (such as syncing with a Home Assistant calendar), alarms can be set via MQTT or the HTTP API. See Using MQTT and the API for full details.
MQTT
Send a JSON payload to the setalarm topic:
- Topic:
cmnd/[your-topic]/setalarm - Example Payload:
{
"index": 2,
"active": 1,
"date": "2026-02-18",
"time": "11:58",
"repeat": 4
}
HTTP API
The HTTP API can also be used to set or edit an alarm by posting a specially constructed URL to the IP address of the controller.
Example: http://[your-controller-ip]/api?setalarm=1&alarmnum=2&date=2026-02-18&time=11:58:00&repeat=4
This command sets the same parameters as shown in the MQTT example.
These integration options provide a variety of methods to manage your schedule. For example, using an external system like Home Assistant, it is theoretically possible to sync the lamp with a personal calendar and automatically schedule alarms based on your appointments. Note that specific Home Assistant automations are beyond the scope of this documentation.