Light Bulb and LED Strip Settings
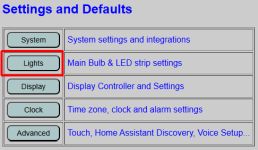
To access the default configurations for the RGBW Light Bulb and the LED Strip, select the Lights option from the primary controller’s main menu.
The configuration page is divided into two distinct sections: the LED Strip settings at the top and the Main Light Bulb settings at the bottom.
💡 Reminder
These settings define the DEFAULT boot state. Changes made here will only take effect after a reboot and do not immediately alter the ACTIVE state of the lights. For more on this distinction, see the Web App Overview.
LED Strip Configuration
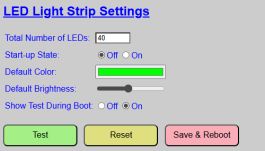
- Total Number of LEDs: Use this field to fine-tune your strip length. If you are using a COB strip or a custom length, enter an estimate and use the TEST button. Adjust the number until the very last pixel is lit, but no further.
- Start-up State: Determines if the strip is ON or OFF immediately following a boot.
- Default Color: The color applied at boot. Clicking the color box opens a full color picker supporting RGB, HSL, and Hex values.
- Default Brightness: Sets the initial intensity (0-100%).
💡 Tech Tip
Some high-density LED strips may not illuminate at extremely low percentages (1-3%). If the strip appears “dead” while toggled ON, try increasing the default brightness to 5-10% and re-test. - Show Test During Boot: If enabled, the strip will flash Red, Green, and Blue during the startup sequence to verify hardware integrity. After booting the LEDs will be set to the specified Start-up state.
- TEST / STOP: Toggles the strip on with current screen values to verify the LED count or color.
Main Light Bulb Settings
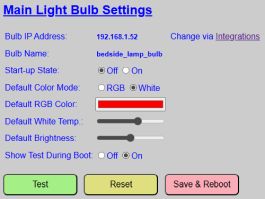
The smart bulb configuration works similarly to the LED strip but includes options for the dedicated white channel.
- Bulb IP & Name: Informational fields. To modify these network identifiers, visit the System Interfaces page.
- Start-up State: Determines if the bulb defaults to ON or OFF after booting.
- Default Color Mode: Choose between RGB (Color) or White (Temperature).
- Default RGB Color: Operates identically to the LED strip color picker above. This color is used when the bulb is in RGB mode.
- Default White Temperature: Adjusts the “warmth” of the white light when in White mode.
- Cool White: ~6,600 K (150 mired).
- Warm White: ~2,800 K (350 mired).
- Default Brightness: Sets the initial bulb intensity. Some bulbs may not illuminate at very low settings.
- Show Test During Boot: Flashes the bulb Red, Green, and Blue during the primary controller boot process. After booting completes, the bulb is set to the specified Start-up state.
Managing Changes
⚠️ Important: Button Independence
The LED Strip and the Light Bulb sections operate independently. Each has its own set of Test, Reset, and Save buttons.
- Clicking “Save and Reboot” in the Bulb section will not save pending changes made in the LED section above it, and vice versa
- You must save (and reboot) each section independently. Otherwise changes in the opposite section will be lost
- TEST: Toggles the hardware on with your current unsaved screen values.
- RESET: Reverts all fields in that section to the last saved defaults.
- SAVE AND REBOOT: Commits the values for that specific section to flash memory and restarts the controller to apply them.