MQTT Setup and Topics

If you wish to use MQTT with the system, you must meet a few prerequisites and also enable and configure MQTT in the web application.
Prerequisites
To use MQTT you must have a local MQTT broker available on your network. While you can technically use a cloud-based MQTT provider, this is not recommended due to the lag introduced between sending a command and having it received by the system. One of the most popular free local versions is Eclipse Mosquitto.
If you are a Home Assistant user, you can turn Home Assistant into your MQTT broker by installing the MQTT broker app/add-on.
Understanding Topics
MQTT works using a subscribe/publish method. The system allows you to define these topics, and your external system must use these same topics for proper communication.
- Publish (stat/): All messages sent by the lamp are published to a topic prepended with
stat/. - Subscribe (cmnd/): All topics subscribed to by the lamp are prepended with
cmnd/.
Enabling and Configuring MQTT
MQTT configuration is found under the primary controller’s System Settings and Integrations.
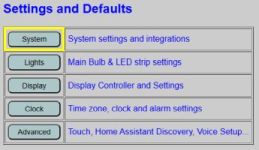
The MQTT setup section is located near the bottom of the page.
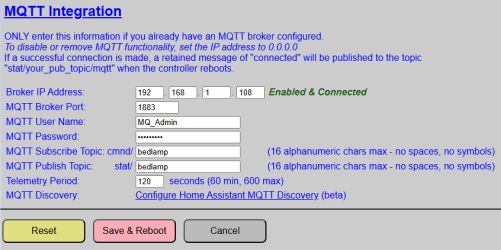
- Broker IP Address: Enter the IP address of your MQTT broker.
- MQTT Broker Port: Default is
1883. - MQTT User Name / Password: Enter the account credentials for your broker.
- Subscribe Topic: Specify up to 16 alphanumeric characters. The system prepends
cmnd/. Example:cmnd/bedlamp/*. - Publish Topic: Specify up to 16 alphanumeric characters. The system prepends
stat/. Example:stat/bedlamp/.
⚠️ Topics
For most brokers, topics are case-sensitive. As a best practice, only use lowercase letters and numbers in your topics. Spaces and symbols are not permitted.
💡 Integration Tip
Since the system prependsstat/andcmnd/automatically, you can use the same string for both (e.g.,bedlamp) to simplify your naming convention.
Maintenance & Buttons
⚠️ Important: Global Page Buttons
Unlike some other settings pages, there is only ONE set of buttons at the bottom of the page. These buttons apply to ALL fields and integrations on the page (WiFi, Weather, etc.).
- Reset Button: Restores any changed values back to the current saved configuration.
- Save and Reboot: Saves all current values on the page. Both the Primary and Display controllers will reboot. The system will start publishing/subscribing to MQTT topics upon completion of the boot.
- Cancel Button: Discards changes and returns to the main menu.
MQTT State (Publish) Topics
The system publishes current values and diagnostic data to the broker. All state topics are published with the Retain flag set to TRUE.
Diagnostic / Boot Topics
These values are published only at boot time, except for LWT (status) which is updated by the broker.
Formatted as stat/[your-publish-topic]/[topic-suffix].
| Topic Suffix | Payload Type | Example/Range | Notes |
|---|---|---|---|
/bulb/ipaddr | String | 192.168.1.52 | RGBW Light Bulb IP address |
/bulb/status | String | online or offline | Bulb Last will and testament. (LWT) |
/display/ipaddr | String | 192.168.1.51 | Display controller’s IP address |
/display/lastboot | date-time string | 2026-04-02 14:38 | Date/Time display last booted |
/display/macaddress | String | 08:B6:1F:3C:1F:B0 | WIFI MAC address of display ESP32 |
/primary/ipaddr | String | 192.168.1.50 | Primary controller’s IP address |
/primary/macaddress | String | 04:83:08:42:14:B8 | WIFI MAC address of primary ESP32 |
Entity State Topics
Formatted as stat/[your-publish-topic]/[topic-suffix].
| Topic Suffix | Payload Type | Example/Range | Notes |
|---|---|---|---|
/alarms | JSON | *See note below | A JSON array of current alarm sesttings |
/alarmtrack | number | 0 - 20 | Indicates the current index/track for alarm sound |
/alarmvolume | number | 0 - 30 | Current max volume level for alarms |
/gentlewake | ON / OFF | ON | Current state of the alarm Gentle Wake feature |
/snoozetime | number | 0 - 60 | Snooze length duration (in minutes) |
/bulbbrightness | number | 0 - 255 | Current brightness level of the light bulb |
/bulbcolor | String | 255,0,0 | Red, green, blue values for current bulb color. Will be updated to white (255,255,255) when bulb is in color_temp mode. |
/bulbmode | String | ‘color_temp’ or ‘rgb’ | Last mode of the light bulb. |
/bulbstate | String | ON or OFF | Current state of the light bulb. Always published in upper case. |
/bulbtemp | number | 150 - 350 | White temperature, in mireds, when the bulb is in color_temp mode. |
/clockcolor | Hex String | #ffffff | Current color of the clock display. Published as a hex color with the leading pound sign (#) |
/dispbrightness | number | 0 - 255 | Current brightness value of the display |
/autodim | ON / OFF | OFF | Current state of the display’s auto-dimming feature. |
/ledbrightness | number | 0 - 255 | Current brightness of the LED strip. May indicate 0 when LED strip is off. |
/ledcolor | String | 0,255,0 | Current RGB color of the LED strip: rr,gg,bb where each value can range from 0-255. |
/ledstate | String | ON or OFF | Current state of the LED strip. Always published in upper case. |
/temperature | number | 71 | If temperture is synced, then the last temperature value received. Value will be output in the same units as configured under the temperature integration (°C or °F). If not integrated, will show 0. |
/timesync | String | ‘OK’ or ‘FAIL’ | If time is synced to an external source, indicates success of last sync. |
/touch1func | String | see notes | Current primary function for Touch Sensor 1. Possible values are: None, Toggle Bulb, Toggle LEDs, Bulb Brighter, Bulb Dimmer, LEDs Brighter, LEDs Dimmer, Display Brighter, Display Dimmer |
/touch1funca | String | see notes | Current alarm function for Touch Sensor 1. Possible values are: None, Snooze, or Stop |
/touch2func | String | see notes | Current primary function for Touch Sensor 2. Same possible values as Sensor 1. |
/touch2funca | String | see notes | Current alarm function for Touch Sensor 2. Same possible values as Sensor 1. |
💡 Alarm JSON Payloads
The/alarmstopic publishes the entire saved alarm array. It is contingent upon your external system to deserialize this JSON to utilize the values.
Example payload:
[
  {
    "index": 1,
    "active": 0,
    "date": "2026-04-06",
    "time": "09:19",
    "repeat": 0
  },
  {
    "index": 2,
    "active": 0,
    "date": "2026-02-18",
    "time": "11:58",
    "repeat": 4
  },
  {
    "index": 3,
    "active": 1,
    "date": "2026-02-24",
    "time": "14:13",
    "repeat": 9
  },
  {
    "index": 4,
    "active": 1,
    "date": "2026-04-06",
    "time": "07:30",
    "repeat": 5
  },
  {
    "index": 5,
    "active": 0,
    "date": "2025-10-28",
    "time": "07:58",
    "repeat": 7
  }
]
Numeric repeat values correspond to 0=None, 1=Sunday, 2=Monday. 3=Tuesday, 4=Wednesday, 5=Thursday, 6=Friday, 7=Saturday, 8=Weekends, 9=Weekdays.
MQTT Command (Subscribe) Topics
The lamp is a very attentive listener. It watches these specific topics for commands; just ensure your syntax is perfect, or the lamp will politely ignore you. Commands should be published with a retain flag of FALSE.
Format: cmnd/[your-subscribe-topic]/[topic-suffix].
| Topic Suffix | Payload(s) | Example | Notes |
|---|---|---|---|
/alarmactive | alarm_num:active | 2:0 | Sets active state (1=on, 0=off). Values must be separated with a colon and no spaces. |
/alarmtrack | number | 4 | Sets alarm track index (0-20) for all alarms. |
/alarmupdate | snooze or stop | snooze | Immediately snoozes or stops a sounding alarm. Ignored if idle. |
/alarmvolume | number | 23 | Sets alarm volume (0-30). 0 may result in no sound. |
/gentlewake | OFF/ON or 0/1 | ON | Enable or disable the alarm gentle wake feature. |
/snoozetime | number | 10 | Sets snooze length (0 - 60 minutes). 0 disables snoozing. |
/playalarm | number | 5 | Plays the current alarm track for the specified number of seconds. |
/setalarm | JSON* | (See below) | Used to set or update a specific alarm slot. |
/bulbbrightness | number | 128 | Sets bulb brightness. Also toggles bulb ON if off. |
/bulbcolor | RGB or Hex String | #00ff00 | Sets bulb color. Also toggles bulb ON if off. Sets mode to rgb. |
/bulbtemp | number | 250 | Sets bulb white temp (150-350). Also toggles bulb ON if off. Sets mode to color_temp. |
/bulbstate | OFF/ON or 0/1 | ON | Sets the power state of the light bulb. |
/bulbrestart | 1 | 1 | Issues a command to reboot the RGBW bulb. |
/clockcolor | RGB or Hex String | #ffffff | Sets the color of the clock display (rr,gg,bb or #hex). |
/dispbrightness | number | 128 | Sets display brightness (0-255). Auto-dim should be disabled first. |
/autodim | OFF/ON or 0/1 | OFF | Enable or disable display auto-dimming. |
/settime | Datetime String | 2026-04-01 14:30:00 | Sets date/time (yyyy-mm-dd hh:mm:ss). Uses 24-hour format. |
/settemperature | number | 72 | Sets temperature raw value. Only applicable if weather source is MQTT or API. |
/ledbrightness | number | 96 | Sets LED brightness (0-255). Also turns LEDs ON if off. |
/ledcolor | RGB or Hex String | #60ff80 | Sets LED color. Also turns LEDs ON if off. #000000 appears as OFF. |
/ledstate | OFF/ON or 0/1 | ON | Sets the power state of the LED strip. |
/touch1func | number | 2 | Sets primary function for sensor 1 (Values 0-8). |
/touch1funca | number | 1 | Sets alarm function for sensor 1 (Values 0-2). |
/touch2func | number | 7 | Sets primary function for sensor 2 (Values 0-8). |
/touch2funca | number | 2 | Sets alarm function for sensor 2 (Values 0-2). |
/displayrefresh | 1 | 1 | Forces an immediate republish of all topics from the display controller. |
/primaryrefresh | 1 | 1 | Forces an immediate republish of all topics from the primary controller. |
/refreshall | 1 | 1 | Forces an immediate republish of all topics from ALL controllers. |
/displayrestart | 1 | 1 | Forces an immediate reboot of the display controller. |
/primaryrestart | 1 | 1 | Forces an immediate reboot of the primary controller. |
/restartall | 1 | 1 | Forces an immediate restart of all THREE controllers. |
/dispsaveconfig | 1 | 1 | CAUTION: Saves active values as new boot defaults and reboots. |
/primsaveconfig | 1 | 1 | CAUTION: Saves active values as new boot defaults and reboots. |
💡 Alarm JSON Payloads
To set an alarm via MQTT, you must create the alarm settings as a JSON payload. The structure of the payload is as follows:
{
  "alarmnum": 3,
  "active": 1,
  "date": "2026-04-06",
  "time": "16:30",
  "repeat": 0
}
| Key | Value | Description |
|---|---|---|
| alarmnum | 1 - 5 | Alarm “slot” number you are editing or updating |
| active | 0 or 1 | Sets alarm as inactive (0) or active (1) |
| date | date string | Alarm date. Must be in yyyy-mm-dd format |
| time | time string | Alarm time. Must be in hh:mm in 24-hour (military) format |
| repeat | 0 - 9 | Repeat setting. Valid values are: 0 = None 1 - 7 = Sunday, Monday, Tuesday…Saturday 8 = Weekdays 9 = Weekends |
Special MQTT Time Topic
If you opt to use MQTT time for syncing, a special independent topic is used. This allows you to leverage existing time-broadcasting automations (e.g., from Home Assistant). See Clock and Time for more information on setting a time MQTT topic.

🔍 Forcing MQTT Time Update at Boot
Since the time only updates when a new MQTT message is published, the clock could potentially show the default date and time (January 1, 2006 12:00 am) following the boot process and this could be shown for up to a full minute before the next MQTT message is published by the source system.
However, when MQTT time is selected as the source, the system will publish a request on a special topic during the boot process requesting an immedate time update from the source:
- Topic:
stat/[your-publish-topic]/gettime - Payload:
now - Retain:
false
If you can configure the source system to listen (subscribe) to this topic and when received, publish an immediate time update, then the clock should update to the correct date/time within a few seconds after booting.
For something like Home Assistant, this would involve creating an automation that triggers on the stat/[your-publish-topic]/gettime topic. When received, the automation would simply publish the current date/time to special MQTT Time Topic described above.
This isn’t a requirement. If not possible to configure from the source, then just note that the clock may not show the correct date/time following a boot until a new MQTT message is published from the source system.
⚠️ Reliability Warning
If using MQTT as a “live” time source and the broker or WIFI goes down, time will not be updated on the clock until the broker/WIFI is restored. This could result in missed alarms.