Controller Commands

Under normal operation, the system firmware abstracts the hardware so you don’t have to worry about which of the three ESP-based controllers you are interacting with. However, Controller Commands are the exception—these functions generally apply only to the specific controller currently active in your browser.
💡 Identifying the Active Controller
As detailed in the Web Application Overview, look for these indicators to know which unit you are controlling:
- Primary Controller: Light Gray background; assigned Device Name in the header.
- Display Controller: Pale Yellow background; “Display” in the header/browser tab.
Primary Controller Commands
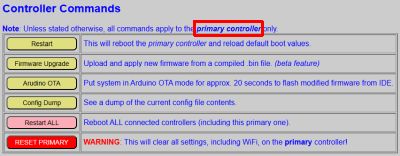
These are found at the bottom of the primary controller’s web page. All yellow buttons in this section impact only the primary controller.
-
Restart: Reboots the primary controller only. Other units remain operational, though some cross-device features will pause until the primary unit finishes its boot sequence.
- Firmware Upgrade: Accesses the update page for the primary controller.
⚠️ Warning
Installing the wrong firmware file on the wrong controller will break your system. See Installing Updates before proceeding. - Arduino OTA: Enables “Over-the-Air” programming for 20 seconds, allowing you to begin flashing code directly from the Arduino IDE. See Modifying the Firmware.
- Config Dump: Clicking this will spit out a raw JSON view of your entire configuration. It’s not the prettiest thing to look at, but it is the “Source of Truth” for your lamp’s brain. If a support request asks for your config, this is where you go to prove that you haven’t actually programmed the lamp to wake you up at 4:00 AM on a Sunday.
- Config File: The primary boot values.
- Discover File: Only present if Home Assistant Discovery has been utilized.
System-Wide Action
- Restart ALL: This is the only “global” command. It sends a reboot signal to all three controllers simultaneously to refresh the entire system.
❗ HIGH RISK: RESET PRIMARY
This command wipes ALL configuration data from the primary controller, including saved Wi-Fi credentials. Use this only if you intend to return the controller to its original installation state. You will have to repeat the Onboarding and System Setup processes.
Display Controller Commands
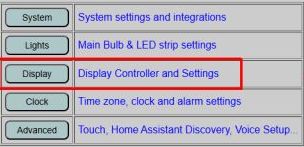
To access these, click the Display button from the primary controller’s main menu to switch to the Display Controller interface.
The commands are located at the bottom of the display settings page. While the interface is similar, these actions only impact the display hardware.
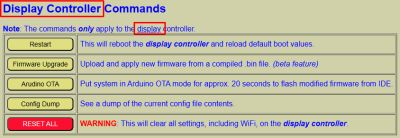
- Restart / Firmware Upgrade / Arduino OTA: These operate identically to the primary commands but target only the display controller.
- Config Dump: Show a view of all configuration files. The display controller manages three distinct files:
- Main Config File: Primary display and boot settings.
- Alarm File: Saved schedules and alarm preferences.
- Sound Library: Maps track names to physical indices on the microSD card.
❗ HIGH RISK: RESET ALL (Display)
This command wipes all display-specific data and Wi-Fi credentials. You will need to onboard and configure the controller again. If the IP address changes after a reset, you must also update the System Interface settings on the primary controller to restore communication.
External Control
Some of these commands can also be send via MQTT or via the HTTP API. See * Using MQTT and the API for a list of applicable commands.