Setting up the System Interfaces
As discussed in the Concepts and Terminology section, this system operates as a “triumvirate” of three ESP-based controllers.
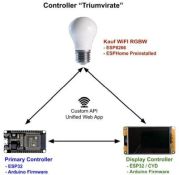
Because these controllers are not physically wired together, they must communicate wirelessly over your local network using a custom internal API. For this to succeed, each controller must be configured with the IP addresses of its counterparts.
📋 Pre-Flight Check
Before proceeding, ensure you have completed the Onboarding for all three devices (Bulb, Primary, and Display) and that you have assigned them Static or Reserved IP addresses in your router.
Accessing the Web Application
To configure the interfaces, you will use the system’s built-in web application hosted on the Primary Controller.
- Power on all three devices.
- Ensure your computer or phone is on the same Wi-Fi network.
- Open a browser and enter the IP address of the Primary Controller (e.g.,
http://192.168.1.205).
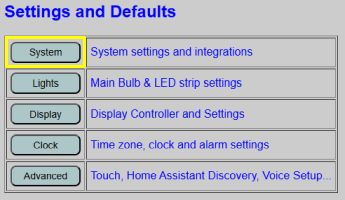
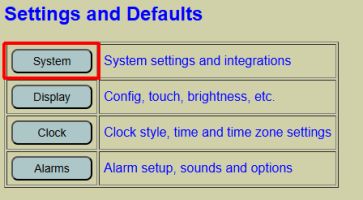
On the main page, navigate to the Settings and Defaults section and click the System button.
⏳ A Note on Automated Verification
When you open the System Settings page, the firmware automatically tests every interface by issuing a command and waiting for a response.
All fields will be disabled and show “Loading…” during this test. Please be patient and do not refresh the page; the fields will become active once the tests are complete (displaying status messages like Enabled & Connected or Not Connected).

Primary Controller Configuration
Boot Delay (Optional)
This setting impacts how the Primary Controller initializes during a cold boot.
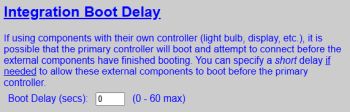
By default, this is set to 0 seconds. If your Wi-Fi network is slow to initialize and the controllers fail to “find” each other during power-up, you can increase this delay. If you aren’t experiencing boot issues, leave this at 0.
Core Integrations
⚠️ IP Addresses: Get the Numbers Right
This is the part where you play matchmaker. You’ll need to tell the Primary Controller exactly where its siblings live on the network. Be precise! If you typo an IP address here, the controllers will spend their lives shouting into the void, wondering why nobody is returning their calls. It’s a classic case of digital “it’s not you, it’s my configuration.”
For the initial setup, you must complete the following three sections:
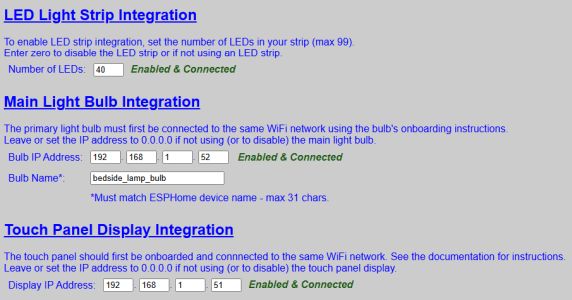
- LED Light Strip: Enter the total number of LEDs used in your build.
- This allows the firmware to calculate proper power distribution and color flow.
- If the exact number is unknown at this point, just enter an approximation (say 15-20) and we’ll fine-tune it later.
- Main Light Bulb:
- Enter the bulb’s IP Address.
- Enter the Bulb Name in “Home Assistant Entity” format (lowercase, underscores instead of spaces).
- Touch Panel Display: Enter the IP Address of the Display (Secondary) Controller.
🌐 Optional Features
Other settings on this page, such as MQTT and Weather Integrations, require external connections or internet access. These are entirely optional and should only be configured after you have confirmed the core “triumvirate” is working.
Save and Reboot
Once the three sections above are filled, scroll to the bottom and click Save and Reboot.

The system will restart. You may notice “boot indicators” such as the LED strip or bulb flashing RGB colors. This is normal and is detailed in The Boot Process documentation.
🔍 Dual Rebooting
Depending upon the specific operation, a reboot of the primary controller may also require a reboot of the display controller. The system handles this automatically when needed.
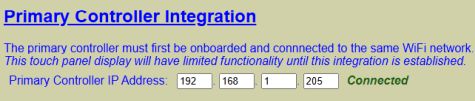
Display Controller Configuration
The Primary Controller now knows how to find the Display Controller, but we must now tell the Display how to find the Primary.
1. Identify the Interface
Launch the web app again by navigating to the Primary Controller’s IP. This time, select Display under Settings and Defaults.
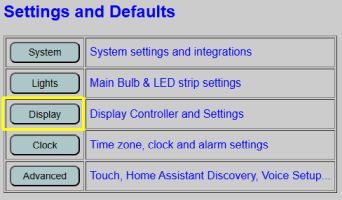
How to tell which controller you are viewing:
- Primary Controller: Light Gray background. Device name also shown at the top and in the browser tab.
- Display Controller: Pale Yellow background. Device name also shown at the top and in the browser tab.
2. Enter Primary IP
From the Display interface (Yellow background), click System.
Locate the integration field and enter the IP Address of the Primary Controller.
3. Save and Reboot
Scroll to the bottom and click Save and Reboot. The Display controller will restart and attempt to link with the Primary. You can monitor the physical screen on the device to verify a successful connection.
With these steps completed, your “Controller Triumvirate” is now fully linked. Once the system successfully completes the boot process, you can return to the web application to customize your preferences or set up optional services.