Concepts and Terminology
To successfully install and configure this firmware, it is important to understand the underlying system design and the specific terminology used throughout this documentation.
🌐 Connectivity & Privacy:
This system is designed to be fully functional on a local Wi-Fi network. While it supports integrations like Home Assistant, Open Weather Map, and NTP time-syncing, these are strictly optional. An active internet connection is not required for core operations.
The Controller Triumvirate
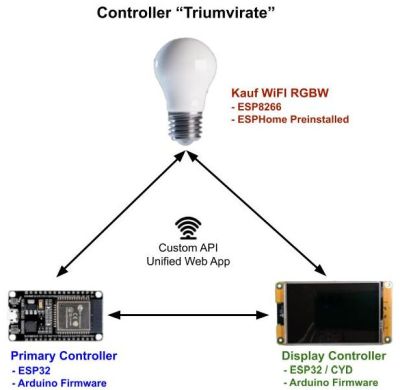
The “Ultimate Bedside Lamp” is not a single device, but a coordinated system of three separate controllers communicating via a custom internal API.
1. RGBW Wi-Fi Light Bulb
The bulb is the system’s “Silent Partner.” It arrives with a specialized version of ESPHome pre-installed, and it expects the rest of the world to keep up with its specific API. Think of it as the talented lead singer of the band who refuses to learn the other members’ names—as long as the Primary Controller sends the right commands, the bulb performs beautifully. Just don’t try to “re-educate” it with different firmware unless you’re prepared for a very quiet (and dark) room.
- No Dependency: You do not need to be a Home Assistant user or have an ESPHome server to use this bulb. It only requires a local Wi-Fi connection.
- Integration: If you are a Home Assistant user, you can optionally import the bulb as an ESPHome node. Note that if you also integrate the Primary Controller via MQTT or Home Assistant Discovery, you may see duplicate entities for the bulb.
- Firmware: No flashing is required for the bulb. You will only need to complete the Wi-Fi onboarding process.
2. Primary Controller
This is a standard 30-pin ESP32 WROOM32 running the custom Arduino-based firmware found in this repository.
- Action Required: You must flash the provided firmware to this board and complete the onboarding process to join it to your local network.
Throughout this document, this controller is referred to as the “Primary” or “Main” controller.
3. Display Controller
This is a “Cheap Yellow Display” (CYD) featuring an integrated ESP32 and a 3.5” screen.
⚠️ Critical Hardware Requirement
The firmware is compiled specifically for the Capacitive Touch version of the 3.5” CYD linked in the build guide. This firmware will not work with resistive touch displays. Using a different display will require significant changes to the TFT_eSPI library and a full code recompilation.
- Action Required: Like the Primary Controller, this board requires flashing the firmware from the repository and Wi-Fi onboarding.
This controller is always referred to as the “Display” or “Secondary” controller.
Main Functions by Controller
The diagram below illustrates how responsibilities are divided across the three devices:
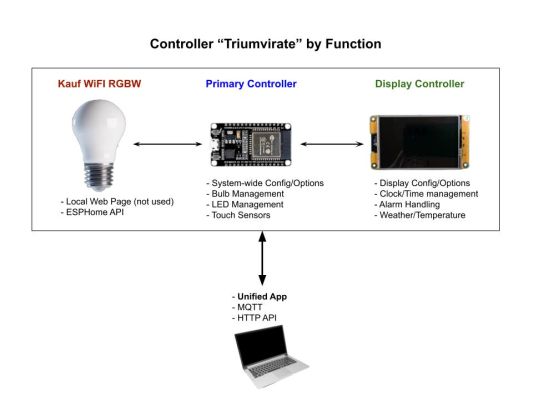
Unified Operation
While the hardware is split into three parts, the user experience is seamless:
- Unified Web App: Once onboarded, you access and control the entire system through a single web interface.
- Single API/MQTT Path: The system internally routes commands (API or MQTT) to the correct controller, allowing you to treat the lamp as a single entity in your automation logic.
For build instructions and physical assembly details, please refer to the written companion guide.