Display Settings and Options

The main display is a 3.5” ‘Cheap Yellow Display’ (CYD) featuring capacitive touch and a resolution of 480x320 pixels.
⚠️ Hardware Compatibility
As detailed in the Build Article, using a different display model will likely require firmware modifications, specifically within the TFT_eSPI library configuration.
Configuring the Display
To access the display settings, navigate to the Display section of the primary web application. Note that the interface will switch to the Display Controller, indicated by a pale yellow background.
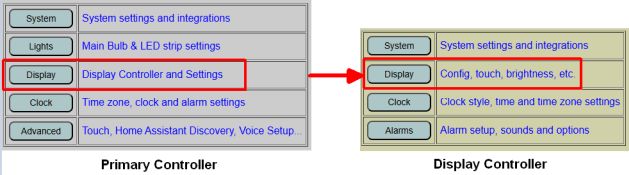
The configuration page is divided into two sections. The top section manages the hardware behavior and orientation of the display itself.

Hardware Definitions
- Dimensions & Touch Address: These values are hard-coded in the TFT_eSPI library during firmware compilation and cannot be changed via the web app. If you are using non-standard hardware, refer to Modifying the Firmware.
- Screen Rotation: Options include 0°, 90°, 180°, and 270° (Default).
- Note: The firmware is optimized for landscape (90°/270°). Portrait orientations may result in text being cut off.
Operational Settings
- Default Brightness: Sets the initial brightness level after a reboot. If Auto-Dimming is enabled, this value is overridden by ambient light levels, though it is still used as the “base” brightness when the screen is tapped.
- Enable Touch: This controls the capacitive touch features of the display.
⚠️ Warning
If you disable this feature, you will lose the ability to access settings or menus directly via the display. Only uncheck this if your hardware does not support capacitive touch. - Enable Onboard LED: If your display hardware includes a front-facing RGB LED, this option allows it to show system status.
- Yellow: Booting/Process in progress.
- Green: Successful connection/boot.
- Red: Failure or Test Mode.

Testing and Maintenance
The system provides built-in tools to verify your display and touch configuration without requiring a reboot.
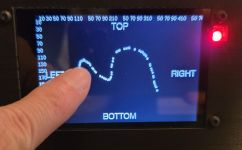
- TEST Button: Activating this shows the visual boundaries of the screen, scale indicators, and lights the onboard LED red.
- Touch Testing: If touch is enabled, you can drag your finger to draw lines, confirming the calibration and responsiveness of the screen.
- RESET Button: Reverts all unsaved changes on the page to the previously saved defaults.
- SAVE AND REBOOT: Commits current settings to the flash memory and restarts the controller to apply them. Unsaved changes are lost if you navigate away from this page.
The Standard Clock Display
When idle, the display shows the clock and environmental data. Several status icons are positioned along the top edge:
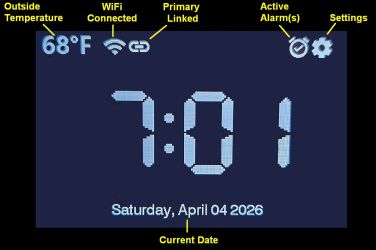
- Outside Temperature: Displays the local outdoor temperature. This requires a configured source such as Open Weather Map, MQTT, or the HTTP API. Refer to Temperature and Weather for setup.
- WiFi: Indicates connection status. A slash indicates the display controller is offline
 .
. - Primary Link: Indicates a successful API connection to the Primary Controller. Shown with slash if not connected

- Active Alarms: Only appears when one or more alarms are scheduled and active.
- Settings: Tapping this icon enters the local settings menu for lighting and alarm control. Details can be found in Using the System.
- Time: The core clock display. Font, color, and 12/24-hour formats can be modified under Clock and Time Options.
- Date: The current date is shown on the bottom of the display. This is also set as part of the time.