Controlling the Lights
This section covers the various methods for controlling the main RGBW light bulb and the LED strip.
💡 Reminder: Active Settings
Most interactions described here only update the ACTIVE settings. This means any changes to colors or brightness will be lost and the hardware will revert to its DEFAULT boot settings if the system is restarted or power is lost.
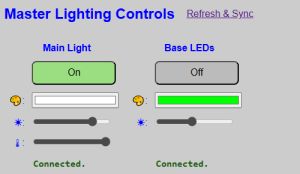
Control via the Web Application
The web application offers the most granular control over your lighting. The controls are located at the top of the primary controller’s main page.
Color Selection
Clicking the color box for either light opens the color picker.
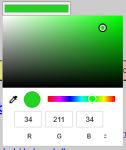
- Visual Selection: Use the slider for the hue and the large box for saturation/value.
- Eyedropper: Select any color visible on your desktop.
- Manual Input: Enter RGB, HSL, or Hex codes.
- Auto-Mode Switch (bulb only): Note that selecting a color automatically switches the light bulb to RGB Mode.
Core Controls
- State Buttons: Toggle the power for either the bulb or the strip.
- Brightness Sliders: Represented by the “sun” icon. Move to the right to increase intensity. The value is sent to the hardware as soon as you release the slider.
- White Temperature (Bulb Only): Indicated by the thermometer icon. Sliding to the left creates a “Cool” blue-white; sliding to the right creates a “Warm” yellow-white.
- Auto-Mode Switch: Adjusting this automatically switches the bulb to “White/Color Temp Mode.” The color picker box will turn white to reflect this state.
⚠️ Performance Note
The ESP32 processes web requests alongside all other system functions. You may notice a slight delay (1–2 seconds) between clicking a button and seeing the interface update. Avoid rapid “multi-clicking” to prevent queuing up conflicting commands.
Refresh & Sync
The web server only sends data in response to a request. If you change the lights via MQTT or the touch display while the web app is open, the browser won’t know. Click the REFRESH & SYNC link to force the web app to pull the current “Active” values from the hardware.
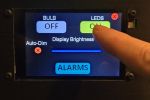
Control via the Touch Display
If touch is enabled, you can toggle the power states directly from the clock’s display.
- Tap the Gear Icon (⚙) in the upper right corner of the clock display.
- Tap the Bulb or LED button to toggle the state.
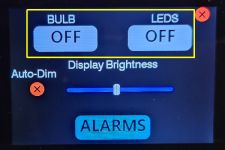
💡 Note: State Only
The touch display only toggles the On/Off state. The lights will turn on using whatever ACTIVE color, brightness, and temperature are currently in effect. To change colors or brightness, use the web app or external commands.
The settings menu will automatically exit and return to the clock after 10 seconds of inactivity, or you can tap the red X.
Control from External Sources
Advanced users can integrate the lamp into systems like Home Assistant via MQTT or the HTTP API.
MQTT
Commands are sent to the cmnd/ topic. Examples include:
- Set LED State:
cmnd/[topic]/ledstate(Payload:on,off,0, or1) - Set LED Brightness:
cmnd/[topic]/ledbrightness(Payload:0-255) - Set LED Color:
cmnd/[topic]/ledcolor(Payload:255,0,0or#ff0000)
See MQTT Setup and Topics for the full list of available topics.
HTTP API
The API is accessible via standard URL posts to the controller’s IP address:
- Set Bulb State:
http://[IP]/api?bulbstate=on - Set Bulb Brightness:
http://[IP]/api?bulbbrightness=96 - Set Bulb Color:
http://[IP]/api?bulbcolor=ff0000 - Set Bulb Temp:
http://[IP]/api?bulbtemp=225
See the API HTTP Command List for details.